Sunday, October 29, 2006

Acid Washing Bricks


Normally new brickwork would be cleaned down with a sulphuric acid mix, a week or so after completion. But we had to wait for our rendering & mouldings to be complete first - well that was the advice we received from the company that provided the mouldings (as the rendering process would make a mess over a newly cleaned wall).


But to our dismay, the mouldings company changed their mind -- after the mouldings were up, they said we should have washed the bricks first, as the acid would damage the mouldings. So we had to buy A$500 of a sealing product to protect our mouldings (it's a suspension of silicone in a solvent, so it doesn't change the appearance after application). It work very well in the end.

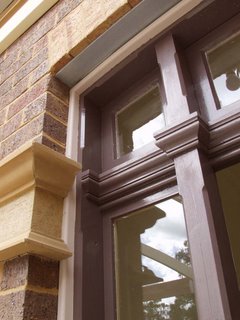
The current fashion amongst brick-cleaners is to use a high-pressure spray of sulphuric acid, diluted 1 part acid to 8 parts water. But this would pose another risk to our mouldings, and it can remove too much mortar.

We opted to have the acid applied with a brush (1 part acid to 4 parts water). Then it was left for about 30 minutes, and washed down with a low-pressure spray. We were thrilled with the reuslt, as we had grown used to looking at un-washed walls for about 6 months!

Saturday, October 28, 2006

Exterior Mouldings


I think I've said this before, but of all the decisions on the house design, the ones associated with brickwork and associated mouldings were the most difficult. It caused many "discussions"!

Traditional Victorian homes usually featured extensive exterior mouldings, as labour was cheap in the 19'th century. These days, light-weight stick-on moulding are used a lot on new homes, but these didn't deliver the aesthetics we required. Instead, we opted for a sandstone product, made by grinding sandstones, and moulding it into a range of shapes. The qoins on the corners of the house, the "stinger-mould" about three-quarters of the way up the wall, and another one placed four brick-courses under the eaves are all made from this sandstone product.

The qoins are laid into the brickwork, but the stringer mouldings are attached with a 2-part adhesive (Australian Standards require 2-pack adhesives for external mouldings fixed above a certain height). To hold the mouldings while the adhesive goes-off, "dutch-clamps" are used. This was very tediuous work, and required a lot of patience and skill from our solid-renderer who did the work. Both stringer courses also have a render-treament applied to complete the effect.

A final comment about the mouldings - they look fantastic, they make our house a one-off, but we could have had an in-ground swimming pool for the same cost!!

Heating and Cooling System

We've had the heating and cooling system running for some months now. I'm not that happy with the way it works - but I am going to get it modified to get it right.

Ducted heating using a centralised gas furnace is by far the most common method of central heating - in Melbourne, Austrlia. (Funnily enough though, our system is made in the USA!). For homes on suspended-timber floors like ours, the ducts are put in the sub-floor space. (Many new houses are built on slabs, and the heating ducts come through the ceiling, which causes problems with stratification of warm air at the top, and cooler air near the floor).

Our furnace has a power output of 120kW, which is probably quite moderate compared to systems found in colder parts of the world (it rarely gets below freezing here). The blower/fan can pump the entire volume of air in the house about once every 15 minutes, so ducted systems usually give the impression of quick, instant heat, even though the fabric of the building takes many hours to follow the room temperature upwards.

Its generally recognised that "convection" heaters (also called hydronic) using heated water or oil pumped around to "convectors" in each room provide the best level of comfort. The difference in the heated air quality can only be the level of humidity - centralised furnaces tend to dry the air due to the higher surface temperatures of the heat exchanger. To counter this, we also installed an humidifier to our ducted system, to increase the humidity of heated air.


Originally we were not going to install cooling, but Julie easily talked me into it. The evaporator (cooling coil) is located in the same unit at the furnace, and is made by the same manufacturer. The condenser is separate, and is located some 6 metres away from the house, behind the garage. The system capcity is about 15kW so it can only cool about half the house.

Cedar Garage Door

We wanted a timber garage door, with a tilt-action automatic opening. This type of garage door can be too heavy with certain timber types, so they are generally only made in 12mm cedar. This is a beautiful timber, and it would be criminal to paint it. So we decided to treat it with oil, which will need re-newing at least every 6 to 12 months. (Clear polyurethanes are not durable in the sun).

The door design reflects the segmented-arch lintels over the top of our windows. We applied two coats of oil.

Spray Painting Raw Plasterboard (Drywall)

As usual, Julie and I elect to do too many things oursleves. And so it was with painting. We spray-painted the raw plasterboard (called "drywall" in the USA) with a high pressure spray-gun.

Fortunatley my wife Julie works in the paint industry, so we were able to borrow a professional spray pump. These things operate at huge, and dangerous pressures - around 2000 pounds-per-sq-inch or over 120 atmospheres.

Spray painting has some issues around it, especially when you are doing it in the 35degC heat of summer. Here's some of my recollections:

* it's quick - the spray pump applies several litres per minute!
* you can paint a large room in 10 minutes
* it takes half a day or longer to prep a room (masking, wiping down plaster with a wet rag to get rid of dust)
* if your spray-head movement isn't smooth, its easy to get a build-up on the wall
* with our 12-foot ceiling we needed an extension-wand, plus a special spray head that has the shut-off valve in the head at the end of the wand ("clean-shot head"?). Without this, the cut-off of paint flow can cause spattering.
* the clean-up of equipment is tedious
* safety is important - a spray head can "tattoo" you with paint pumped under your skin if you get too close. Pressure must be relieved properly before dismantling equipment for cleaning. Masks and goggles are mandantory.
* only use spray-painting for the first two coats at the most, beacuse it does not provide the "orange peel" texture of a roller, so plaster-variations show up, and it doesn't look as good.
* it is possible to spray the second cost, and follow over the sprayed area with a roller to impart the required texture (but we only did the 1st coat with a roller).

Garage Floor: 2-Part Epoxy

In Australia we can still use 2-part epoxy coatings, which is what we have used to coat our garage floor. Before applying the epoxy, the concrete floor was etched clean using sulphuric acid (H2SO4) diluted by adding the acid to the water. Protective gear is needed when messing with acid.

We used a light-grey colour epoxy. The big advantage of coating the floor becomes apparent when you have to keep it clean. It sweeps so easliy, and doesn't keep creating its own dust (like bare concrete does).

Blog Catch-Up: Jan to Oct 2006

This blog is now well out of date. I am going to have a go at some catch-up postings, to cover the main events of this year. Our house is still a long way from finished, even now.....