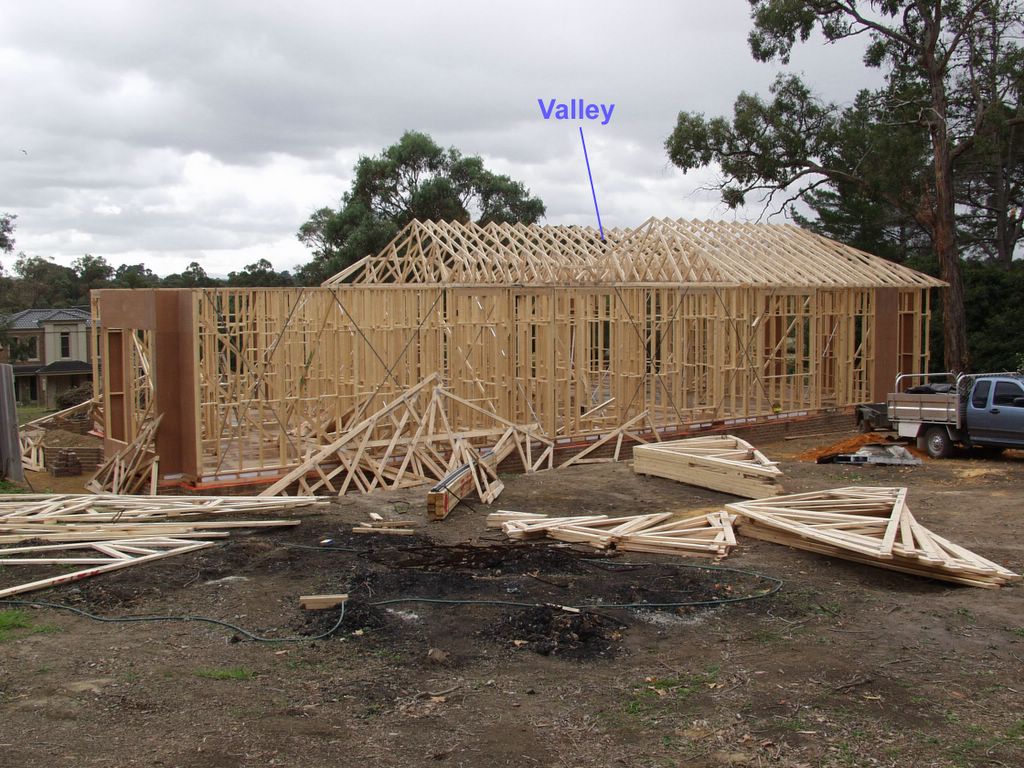
Thursday, June 30, 2005

Finished Frame

Well the frame is finished. The roofers started work this week - so far they have installed roofing sarking/paper and the battens for the slate. The battens are 35x35mm oregon, which surprised me. I was expecting pine. The battens have to be a soft timber to suite the slate shingles.

One item that is a bit behind is the chimney. This is being done next week, so the brickies will have to work in with what the roofers are doing.

Anyway, there is a photo below of the frame, showing the resemblance to our two "inspiration" houses below that. (Sorry the photo is a bit poor - the shadows kind of mess-up the view).

Having just completed the fitting of the fascia and guttering, the frame is now finished, and ready for roofing.

This is another Melbourne home, that has also been an "input" to our design process.

Wednesday, June 29, 2005

Inspiration

One of the Melbourne homes that has had a large influence on the architecture of our new house is "Coolattie". I thought I would include a photo of it below for reference. Our house will have a return-verandah, overall front-of-house appearance, and roof-line design similar to Coolattie, except that ours is not quite so large. Coolattie is a very big house - I have counted the brickwork many times to determine its dimensions!

Coolattie


The house that inspired our design - "Coolattie", circa 1897.

Monday, June 27, 2005

Box Gutters Can be Bad

Our house requires a box gutter, as we have kept the roof line low with two ridges instead of one. Box gutters are called box gutters, as they are often folded with right-angles at the bottom (so the cross-section is rectangular) and are often seen where the roof meets a parapet wall. In our case the folds at the bottom are a much bigger angle than 90 degrees, but its still called a box gutter.

I designed the gutter, by referring to the Australian Building Code. It provides tables giving 100-year rainfall intensities for various parts of Australia. However, it usually happens that the 100-year-rainfall-event ocurrs the week after you move into the house! So to err on the safe side, our box-gutter has 5-times the capacity of the 100-year rainfall event. I hope it never overflows, as it would make a mess inside.

The gutter sits on timber-flooring (left over from the platform flooring) fitted into the top-chords of the roof trusses. This means you can walk along the gutter without damaging it -- that's very useful for maintanence. Personnally, it looks wide enough to have a tea-party up there....

All the water from the box-gutter flows onto a short section of slate-shingled roof, so we are going to put flashing over the top of the shingles, as it is too much water for shingles to take.

The Box Gutter is Enormous


Here is the view looking up the central valley in the roof. Rainwater run-off flows towards you.

Hiring a Walkway for the Fascia & Guttering

With our ceiling being 3.6m above the floor, it means that fitting the fascia board and the guttering is nigh-on impossible on a ladder. Even with two people. In addition, it would be an un-safe work practice!

I made enquiries about hiring a suspended walkway that attaches to the wall frame. At first most companies wanted to fit the entire house with a continuous walkway, leave it in place for 10 days, and the taking it away. As you can imaging, this was expensive.

Finally, for about a quarter of the price, I hired (for two weeks) enough gear to do one 25m run of the house (the entire perimeter is 86m), and I installed and moved it myself. (I also transported it in my trailer). So, in about 4-moves, I was able to fit the fascia and the guttering around the house. Of course it took longer than I expected, and it also rained a lot. But in the end, I have made it, and saved money on the guttering and fascia installation.

One technical note on fascia. We have chosen a timber fascia, even though colorbond steel is very popular now. Again, we wanted the traditional appearance. Fascia used to be made from Canadian oregan (spelling?). But hese days a better product is "finger jointed" LSOP pine. It is treated to prevent rot, and it is so, oh so, straight compared to oregan of recent times (sorry Canada!). The fascia is fitted so its top surface is 35mm above the top-chord of the trusses (our battens are 35mm).

Also, when ordering roof trusses, they have to leave about 50mm of top-chord protruding past the point where the fascia will be installed (this is so you can run a string line, and cut the top-chords off, giving a straight line for the facia). For metal fascia, they don't bother with this, as it has adjustable brackets to get it straight.

With the fascia and guttering now complete, the roof is ready to fit.

Rainwater Systems & Galvanic Action

Our house has verandahs on some sections of the external walls. Traditionally, water from the main roof is collected in a gutter, and then fed on to the verandah roof below via "spreaders". This is the arrangment that we want to adopt (the other option is to put separate downpipes for the roof and verandahs, but this is tedious and messy looking).

For months we have been trying to decide what colour fionish the verandahs would be. We were going to use a "colorbond" product that has a zinc-alume coating with expoxy coloured coating. In the end we have decided that we want an un-painted look, so are verandahs will be plain galvanised corrugates steel (it has to be galvanised with zinc, not zinc-aluminium as the latter is so bright and never dulls-off to a patina).

In addition, the we decided that the ridge-capping has to be plain galvanised steel (with roll-top profile).

All this has implications for the deign of the rainwater system. Water that has been on a zinc-alume roof, cannot run-off onto a zinc ("galavnised") roof, as electrolytic action results in corrosion of the zinc-roof. (However, water that has been on a zinc ("galvanised") roof can run onto a zinc-alume roof without corrosion problems. There is a known sequence of the order in which various metals can be used, called the galvanic series or some such, if you need to know more.

So, we have decided that our entire roof rainwater system will be zinc galvanised. This is good, as it gives us the traditional appearance/patina we want. But its bad, as the newer zinc-alume products are much more long-lasting. Oh well....it will just mean that I have to make sure the gutter drains well, and doesn't get clogged up with leaves.....

Monday, June 06, 2005

Was "common" - Now "unusual"

Nearly every Victorian house we have seen and liked, has had a suppressed, or reduced roof line. This is achieved by dividing the roof into two, and have separate ridges of the same height for each half. This if course means that there is a central-valley running the length the building - but the visual effect is fantastic! If it had a roof with a single-ridge, it would not look like a real Victorian home.

A roof with a central valley was once a common thing, but these days it is quite unusual. (Australian Federation architecture, which followed the Victorian period, dispensed with this style of split-roof, in favour of high ridge-lines, giving the roof a dominant visual effect to the overall design.)

Two other bonuses from the central-valley roof-design are:
- ugly solar panels for water heating can be hidden in the valley
- the area of the roof to be clad with slate is reduced by about one-third, thus reducing slate costs (although this is offset by increased cost to erect the roof)

The central valley has to have a box-gutter, of a decent size, to drain the rainwater. More about that later.


The roof assembly about half-completed.

First Roof Truss

The first roof truss to go up was a "girder truss" that is designed to support other trusses, which connect to it with metal boots. The truss shown support about 2 tons of roof mass.


The first roof truss is up.

Sub Floor Vents

We are considering going on yet another splurge. This time on sub-floor vents. Some (not all) older houses have a decorative design in the sub-floor vent. I have also seen the regular checker-board matrix of squarte holes on period homes too, so technically we could use them as they are cheap.

I have found two decorative sub-floor vents - the cheapest one is shown below. I am happy with this design, but the cost to do the whole house is high (we need about 50). Another idea is to just put these on the front of the house.


A Victorian-style sub-floor vent.

Roof Trusses Arrive

On May the 19th 2005, our rood-trusses arrived. I was not on-site, but my carpenter sais it too threee hours to unload.

Often the trusses are placed on top of the newly erected wall frame, but this seemed impractical in our case, as there were so many different types of truss (and sorting them on top of the roof would be impossible).

Plumb the Frame Walls

Its been some weeks since I last posted, so the next few posts are a bit of a catch-up.

The walls for the frame were set square and plumbed over about two days. Our frame was somewhat more demanding than most, as we required the external face of the frame to be at 250mm (+/- 5mm) from the internal face of the brick-veneer skin. Normally the frame can vary +10/-15 and it doesn't matter, but that is for windows than protrude through the opening in the brick. Our windows won't do that, instead they are flush with the back face of the bricks, as was done in the "old days".

To hold the frame square, timber beams were set at angles from the wall top-plate down to the floor.