Thursday, April 28, 2005

Cantilvered Bearers


The bearers in the above photo are supporting roof-load, and the corresponding wall has a 270mm "dog-leg" in it, so the stumps and bearers also follow this. At the nominal junction, we have overlapped the two bearers by leaving a cantilvered end on each bearer. For the F17 timber being used, the maximum allowable cantilver is 400mm.

Here is Andrew, our carpenter, in action with a chalked string line, marking out joist locations.

Fireplace Hearth

I nearly messed-up the fireplace base. Over the weekend I was reading the section in the Building Code of Australia on heating devices. Of course, the fireplace has to be built on a masonry base - but so does the hearth immediately in front of this. The hearth must extend at least 300mm in front of the fireplace, and extend at least 150mm either side. I had forgotten that the hearth also needed a masonry support, so over the weekend I mixed up some mortar and laid extra bricks to support it (fortunately the fireplace footing was large enough to support these extra bricks.

Sub-Floor Framing


Here is the sub-floor under construction. The orange plastic on top of the base brick-work is a termite shield (laminated plastic foam impregnated with chemical) complying with the Australian Standard. The base brickwork for the fireplace is on the left side of the photo.

Big Bearers & Joists

The design of the sub-floor is taken direct from Australian Standard 1684. However, previous experience has shown that when joist spans approach the maximum limit, floor bounce can show up as a problem. So I have used a conservative design approach. All bearers are 90x90 F17 SHW (normally 90x70), and my joists are 90x45 F17 SHW (often 90x35). Bearers are spaced 1650max, and stumps are spaced 1500max.

Engineered Floor Trusses - NOT

Why am I not using engineered floor trusses? It is almost certain that they would be cheaper. These floor-trusses can span several meters, so that the bearer spacing could be 3.6m, and the number of stumps required is a lot less.

I am not convinced that floor-trusses are free form "floor bounce" and "drumming" (resonance) when walked on. I could be wrong about that, but I had more confidence that the traditional stump/bearer/joist approach would keep me happy.

Ordering Timber for Sub-Floor Framing

While the stumps are in perfect alignment laterally, the spacing between stumps supporting one particular bearer can vary slightly from stump to stump. This means that over three stumps, the nominal total length of the bearer is 4.5m, but in reality this could be +/-200mm. This has to be taken into account when determining what lenghths of timber to order (e.g. allow 150mm extra over joins for each piece of timber).

I did a bearer & joist layout plan for the floor, with joins and lengths marked out for the capenter. This means that I can order just the right amount for the job. In my case I needed about 1.4 km total of timber, all stress grade F17, and all 90x45. I ordered about 6 or so extra lengths to cover losses for unforseen factors.

All the quotes for the F17 were very close, at about A$5.30 per meter.

Friday, April 22, 2005


Along the back-wall there is a sub-floor access door, and a lintel (galvanised beam) to allow for a ducted heating portal to be easliy established later on.

Sub-Floor Access and Portals

Don't forget to put a sub-floor access door into you base brick work. Also, if you know the location of other services, such as heaters, the allow for these as well.

I had a lintel put into the base brickwork as it was being laid, so that the portal for the ducted heating system would be easily established later on. In addition, I had the bricks laid with five-courses of "straight-bond" at the sides of the lintel, so the brickwork could be easily knocked-out later.

Using a laser-level to set the final stump height - beep, beep, beep,....beeeeeep! Note that there is a double-stump here, with an extra large pad (500mm dia) to cater for concentrated load coming from the roof at this point.

Position Stumps

Stumps are set (50mm min) into concrete pads (minimum 150 thick), located at a depth to get "good ground" (100kPa min bearing bressure).

The concrete delivery truck (for the pads) will start charging for waiting-time after about 15 to 25 minutes, so you have to off-load the concrete quickly, and keep one or two barrows in reserve to cover any deficiencies.

Here are the approximate steps for doing stumps:

- Mark out the site as already discussed in a previous posting.
- Drill stump holes with a power-auger
- Clean out stump holes to good ground at the base (you can hire tool for this ...adding small amount of water to the residue helps make it easier to remove as well).
- Set up a laser-level
- Measure the depth of every hole if they vary (as ours did)
- Place an order for stumps of correct length for each hole (they come in 100mm increments from about 1000mm to 2400mm)
- Schedule a concrete mixer for the next day
- Arrange an inspection by the Building Surveyor you are using (normally early in the moring)
[...Next Day...]
- Set up the laser level again
- Prepare ramps for barrowing the cement from the mixer to the stump holes
- Place concrete in holes, keep some spare in reserve after the mixer has left
- Run string lines for levels, but only tap each stump down to about 10 or 20mm above the string line. (If the cement is fresh, the stumps may sink too much, but this will changes as it begins to cure.)
- Use the laser level to do a final tap-down of each stump to the exact level
- Back fill earth into the stump holes
[...Next Day...]
- Ram-up the earth surround each stump hole with the top of a cro-bar (best done after the concrete is cured - i.e. the next day)

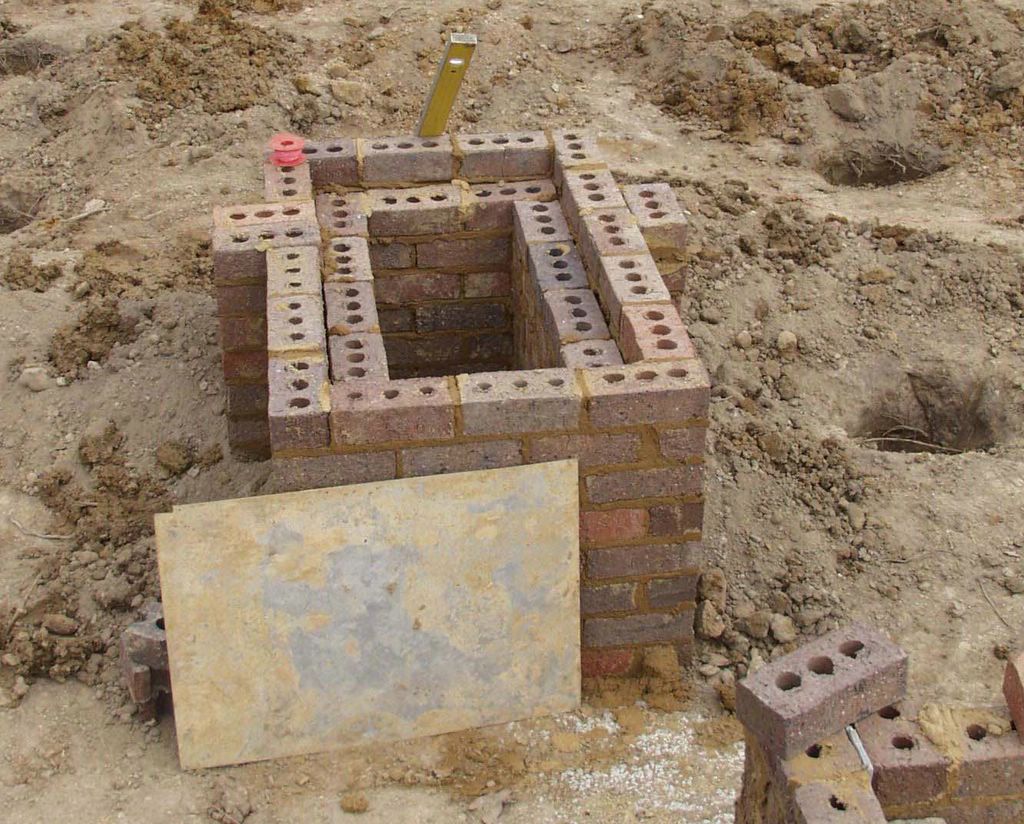
We had 121 stumps to locate, and so this was a two-step process, taking an extra day for the other half of the stumps. (The fireplace base was also filled on this second day -- see previous post too).

Fog at an early moring start during Autumn (OK, "Fall" if you are in the USA).

Early Morning Starts

For an office-worker like me, it comes as quite shock to be on-site at 7:00am in the morning, but this is the time that the building industry starts, so you have to do it.

The up-side is that on many occasions, I can be on-site for 1 to 2 hours in the early moring, and then go on to the office at 9:00, thus saving on use of annual leave credits.

The photo above shows some fog early one morning on-site.

Digging and preparing stump holes. Note that normally such machines get over the base brickwork on ramps, but we were fortunate that the brickies were not quite ready to finish, so a gap was left in the base brickwork for the machine to traverse through.

Stump Holes

The stump holes were excavated with a machine fitted with an auger. The cost was A$3.00 per hole, for 121 holes. At the same time, I hade 6 additional holes done for supporting the back verandah.

Stump mark-out with lime divits. If you click on the image to get the larger size, you will clearly see two circles marked in lime -- these designate the larger pad diameters required for the additional stumps supporting concentrated roof-load.

Preparing for Stumps

As we detest slab floors, we are having a traditional suspended timber floor supported on stumps spaced at 1500mm intervals. The bearer spacing is 1650mm max, so we are well inside the building code for structural performance. We have 121 stumps, ranging from 500 deep, to 1200 deep.

To mark the stump locations measurements are made off the base brickwork. At each stump location, a small divit is removed from the ground, and filled with lime. This method is very robust against damage from the hole-digging machinery -- if the machine covers the location of a hole with excavated soil, it can easily be found again as the lime will show up when the covering soil is removed.

Fireplace base brickwork. Note the provision for bearers to locate on piers either side of the base.

Fireplace Base

The fireplace base stands on a pad footing the same depth as the strip footing. The base is built up using double-skin brickwork, and stops at bearer level, with the other base brickwork. The inner skin stops one course below that, and then a slab of concrete is poured into the top (a sheet of timber covers the central cavity). Re-inforcing steel is placed into the cement. The fireplace proper is then laid onto the base bricks and concrete slab.

Base Brickwork

The brickies arrived on Monday April 18. The brickies need everything supplied for them - this means: sand, cement, lime, water-proofing additive, colours (oxides) if required, brick ties (for expansion joints, and for double-brick sections).

On the first day, thay did nearly half the house, but that was the easy part, with just a straight run along both walls

The other half of the house took another 3 days, as this included three box-sections for windows, and one bay-window section.

We did tests for mortar colour, by mixing up test-batches on the weekend before the brickies arrived. We decided to go for natural orange/tan sand with grey cement.

Bay Window Base Brickwork

Thursday, April 14, 2005

Perfect Synchronisation - Its Raining

Well, after months of no rain, it has started today.

The brickies turned up at about 7:15am, and it was raining by 7:30am when I arrived on site. So all work is off for today, as it looks "set in".

Organising Base Brickwork

All the bricks below floor level are called "base brickwork". This is the next step in our project. A few of the things that need organising for this are:

* Type of sand (1 cu-m for each 1000 bricks is required)
* Type of cement (4 x 20kg bags per 1000 bricks)
* Lime
* Mortar colour (hence the need to choose sand & cemet types). Oxides can also be used to tint mortars to the most dreadful of colours if desired.
* Site power (a generator has been hired, as it could take a month for the power company to connect the site up!)
* Site water supply - I have put in a 50m long high-density poly pipe from the only tap we have to the actual house-site.
* Site toilet: we have hired a standard builders-loo, with integrated water storage and effluent storage tank that can be pumped out as periodically.
* Brick deliveries: make sure the bricks are placed around the site close to where they are needed, so it makes life easier for the brickies
* Sand delivery: placed on the high-side. In my case it has been put on top of some concrete-spoils left over from the footing pour (so it will be kept clean)
* Bricks should technically be covered, as rain water will be absorbed into them, which alters the way the bricks bond with the mortar (an efficient bond requires the brick to absorb water from the mortar).
* Sub-floor access and portals for heating ducts need to be located for the brickies, so that they don't brick these up.
* In/Out points for plumbing pipes need to be marked too. Preferably get some short pipe/conduit sections placed into the wall as it is built, and remove these once the mortar is set, otherwise the plumber will knock holes into the brick wall when a hole is needed, only making for more work later.
* Any un-seen sections of brickwork can be done with cheaper "2nds" or "commons" bricks (and we are using these on the inner-wall of our verandah, which won't be see at all).

Lastly, this needs to be co-ordinated with the bricky, so its all ready to go when they turn up.

Burning Off

Now that the CFA has declared an end to the fire-risk period, we applied to the Council for burn-off permits over two weekends. The Council looked at the piles of ex-trees, and ex-vegetation to burn, and said that each pile had to be split into two before burning. On that basis we got our permit.

We spent two full-days (one each weekend) burning off for about 8 hours each day. We actually started a new pile for the fire, and transferred all the existing piles onto this new pile as it burned -- this is the best way to limit the amount of fuel the fire has access to. I was worried about complaints from neighbours, but it all went well in the end.

We have one more pile to dispose of, which will need a new permit, which we will apply for later in the year.

The New Fence

The New Fence

Well, this got of to a slow start for a number of reasons:

The fence had to deviate around some trees that had to be conserved. I wanted to box the fence around them, by setting the fence back on that section. Everyone else wanted a deviation in the fence line around the trees. In the end, everyone else won, and the fence now bends around the trees (and it looks great....so what would I know!)

Then, originally I had envisaged that one-in-three posts would be treated pine timber, with two-in-three being steel-star posts knocked into the ground. Others felt that all posts should be timber. Again, the others won, and the fence looks better for it -- although we had to go and buy more materials on Easter Saturday.

Then the post-hole digger was useless (see previous post). So we had to dig all holes by hand, with cro-bars and shovels. For about half of the 50 or so posts, the ground was OK and digging went well. But for the other half, the ground was really dry and hard (near gum trees). Also, the two gate-posts took about one-hour to dig, as these had to go down 900mm into really hard ground. All posts were placed using the "rammed-earth" method (no concrete required).

The finished fence took three days (150m of fence) to construct. The wire is White's Hinge-Joint rural fencing wire, with two plain top-wires as well. We have two 14-ft gates for site access, across a 28-ft opening.

Post Hole Diggers can be Useless

Just before Easter my wife arrnaged to hire a post-hole digger to do the holes for the fence posts. It was a two-man unit, with a 2-stroke motor an 9 to 10 inch auger. Well, we tried it out on one hole and it was useless. It was very hard to hang on to, as it dug through the ground, and very slow as the cutting angle on the blade seemed to be set so it wouldn't cut much at all! Towards the bottom of the first hole, it was beginning to have trouble in just removing the soil in the auger, let alone cut new ground as well.

We gave it up as a bad joke. Unfortunately, the hire-place was not interested in our difficulties, so it ended up being a waste of $100.