Sunday, September 30, 2007

Downpipes


Of course the new rain-water collection pump has put the pressure on me to get all the downpipes finished. Most of them are done, but I had left the more difficult ones until last. Above is a photo of the downpipe that collects water from a gutter, and also from a sump located at the end of a "box gutter" in the roof (hence I have two pipes joining together). If the sump blocks-up, the over-flow water will run into the "rain head" shown in the photo too.

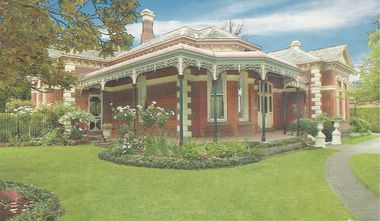
On the verandahs, we had to partially rebate each down-pipe into the "stringer-molds" that decorate this section of the house. It was a bit stressful, but it has turned out well. The verandah is yet to have the cast-aluminium lace-work fitted (another consideration in figuring how the downpipe should be fitted). The down-pipes are also "offset" from the brickwork by about 40mm, as the sandstone quoins protrude from the brickwork by about 25mm, and the down-pipe has to clear this at the top and bottom.

Rain Water Pump Commissioned

A few weeks back, our rain-water collection pump was finally commissioned. The photo shows two pits (each 600 x 600mm) - the first of which is a settling pit to help removed any debris collected from the roof. The sump-pump is in the seond pit, which also has two over-flow pipes that discharge to the stormwater "legal point of discharge".

Our tank only holds 12,500 litres, as it was initially required only to supply water to the toilet cisterns. But with the on-going drought, I am likely to triple this to 36,000 litres eventually, so that we can water the garden during summer.

Thursday, September 20, 2007

Fireplace

I stuffed up slightly with the brickwork for our fireplace. The hearth in front of the fireplace opening must extend out 300mm to satisfy building regulations. Because we chose a different mantel to the one originally envisaged when the brickwork was laid, I have had to extend the hearth by about 100mm. This was done by removing (see below) one of three floor joists (leaving a double joist supporting the floor around the opening). In its place I have put an un-equal angle steel lintel to provide support for the slate hearth.

The finished result, with the slate hearth in-place, is shown below. I also have to confess that around this time we also painted the walls in Dulux Rajun Cajun - a very bold colour indeed.


Monday, September 17, 2007

Corinthian Capitals


Although the main plastering was done some months back, the hallway-arch was left until later. The main reason for this was that it took us time to decide what we wanted! At first, we couldn't seem to find all the right elements in the arches we saw on display -- but then one of the suppliers said that we could mix-and-match any design elements, as they could make anything we wanted. So I did a design drawing in AutoCAD (which the plaster-supplier also used!) and emailed the order to them. The CAD drawing is shown below.

Like the Victorians did 120 years ago, we have copied design elements from Classical Architecture, the most obvious of which are columns with Corinthian capitals.


Kitchen Arrives


The kitchen installation has been tedious to say the least. But it has arrived, and we have been painting it ousleves over a period of months. Julie wanted a hand-painted brush-finish in semi-gloss enamel. While two-pack finished are very popular these days, we felt that the super-smooth finish would not suit the provincial style of out kitchen.


However, we did have the cabinets primed by the manufacturer before delivery. Even so, it has taken months to paint it (in part because we removed all doors & drawers first before painting them). The cabinets all have three top-coats of Dulux oil-based enamel, although this was hand-rubbed back after each coat to ensure we achieved a smooth finish. (Also, it was nessecary to rub back the spray-painted primer to eliminate the "orange-peel" texture from the spray-gun.)


The photo shows the "dresser" side of the kitchen after during painting.

Mouldings - Ovolo & Cyma


Here are two examples of moulding-profiles used in our house ...these are on a large scale as they form the support-brackets for the chimney-breast aboev our kitchen stove. The curved profile on the top-half of this bracket is "ovolo", while the profile on the bottom half is "cyma". See also this description of moulding types used in classical architecture.

Hallway Painting

Just a quick note to document the paint-job we did on out hallway (some months ago now). The photo shows the cornices masked with blue-tape to so we get a "proper" straight line where the different colour of the cornice meets the wall and ceiling ...yes, I did the first room in the house by cutting-in without tape, and it was deemed "not satisfatctory". So its blue-tape everywhere from now on. It's best to by the low-adhesion type (it comes in different levels of adhesion) as this will minimise the chance of any underlying paint from coming off-the-wall with the tape when its removed.

Friday, September 14, 2007

Front Door Knob - Genuine This Time


I guess that for people who own "real" Victorian homes, they might wonder why we bother with "reproduction" stuff. But on this occasion, we have the real-thing -- a door knob with 100 years of history. We found it at a tile-shop we visited, and I bought it for my wife's birthday. Of course it didn't get fitted in time for her birthday, but it is fitted now. It looks great (...the maid will have to polish it once per week -- NOT! )

Victorian Light Fittings


I am a sucker for decent light fittings. This is one of the few things that my wife has not had to convince me of. We have bought a few for the house now -- we have a shop in Melbourne that stocks really good lights, with a range to suit any period.

One of our first lights was for the master bedroom, shown here. The wall-painting is finish, but the French-blue detail on the cornice has not had a final coat yet.

Monday, September 10, 2007

Skirting Boards


We recently got our carpenters to come back on site to fit the skirting boards and architraves. We have taken ages to choose these -- probably because tehre are so many designs.

Our skirting boards are 300mm high, which I admit to thinking that thay would be too big. But with the 12ft ceilings they look great. Our architraves are 150mm wide, expect for some doors in service-areas where we used 90mm as the 150mm took up too much space.
The skirts & archs are made from MDF, which is very tedious to prime with undercoat as it behaves a bit like blotting paper. So we had our factory primed and sanded, thus keeping our sanity.

Sunday, September 09, 2007

Cable Actuated Door-Bell

We stumbled across a new (reproduction) door bell that is the same as that used 100 years ago. It is actuated by a cable, running through pulleys in the roof space. At the front door, there is a knob that says "pull", and if you do so it causes the bell to tinle as it wobbles on its spring-suspended mount. This was another crazy project really, as it too the best part of 2-days to install.

The only down-side with this bell is that I can't hear it in the garage. But of course I figured a way to fix that - I rigged up a micro-switch on the stainless steel actuating cable, so it cause an electric bell to ring in the garage. This aded another days work!

It was, despite the cost (A$220) and effort (3 days) the right thing to do, as we love it, and so do visitors.